Introduction
The purpose of this document is to show how to re-establish a MV40 connection to Microscan utilities (Autovision etc) by re-setting a static IP address and gateway, for scenarios where incorrect IP parameter settings have caused connection issues.
If you are having issues connecting to a Microscan camera, please first refer to the below article:
Unable to connect to camera with Autovision
Procedure
The Microhawk has a diagnostic boot mode for diagnostics and recovery. This method shows how the MV40 can be put into this mode via Ethernet.
Please ensure that the PC is on same subnet as 192.168.188.x.
It is recommended to connect PC to MV40 directly rather than relaying through a switch.
-
Hold the button of the MV40 on power ON for 30 seconds. This resets the IP address to 192.168.188.2
-
If you can ping the IP address but are still unable to get connected via software proceed to next step
-
Download and install Putty
Click here to download putty
-
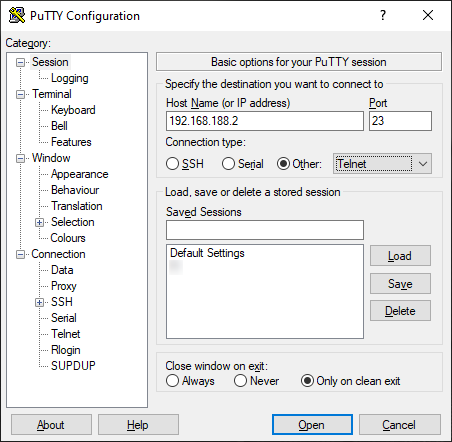
Open Putty and enter IP address of scanner, select ‘Telnet’ for connection type.
Select ‘Open’:
-
Username pops up in command prompt. Enter ‘target’
-
Password: password
-
If the above steps have been done correctly then you will see an entry called [SAFE-KERNEL].
You can type BP_Dump() to get a list of boot parameters for the Microhawk.
-
To configure the device to a new static IP address(in this example the new IP is 192.168.0.10) type:
BP_UpdateIP(“192.168.0.10”, “255.255.255.0”, “0.0.0.0”)
Press Enter
-
To turn off DHCP, type:
Type BP_UpdateDHCP(0)
- Exit putty and power cycle the MV40. You should now be able to reconnect via Microscan utilities.