Introduction
A NTP (Network Time Protocol) server is a specialized network server that provides accurate time information to connected devices. It synchronizes the clocks of computers and other devices over a network, ensuring that all devices maintain the same time. This is crucial for various applications, including time-stamping transactions, coordinating events, and maintaining data consistency.
This article explains how to synchronize time between a NX/CP1L using a NTP Server. A NTP Server can be a running on a Windows 10/11 platform or from a server on the internet.
How to Setup a NTP Server in Windows 11
OMRON products that have Ethernet connection support auto adjustment of the internal clock by using SNTP (Simple Network Time Protocol) however this requires a NTP (Network Time Protocol) server. For example, windows 11 can be used as a NTP server.
To setup a NTP server in Windows 11, please follow the next steps:
- Open a command prompt as Administrator.
- Run the command “regedit”
- Change KEY_LOCAL_MACHINE\SYSTEM\CurrentControlSet\Services\W32Time\Config\AnnounceFlags to “5”
- Change HKEY_LOCAL_MACHINE\SYSTEM\CurrentControlSet\Services\W32Time\TimeProviders\NtpServer\Enabled to “1”
- Change HKEY_LOCAL_MACHINE\SYSTEM\CurrentControlSet\Services\W32Time\TimeProviders\VMICTimeProvider\Enabled to “0”
- Close regedit.
- Run the command “net stop w32time”
- Run the command “net start w32time”
- Close the command prompt.
- Open the windows Defender Firewall with Advanced Security page
- Create an exception in the Inbound/Outbound rules with the following parameters:
Rule Type: Port
Protocol: UDP
Specific local Port: 123
Action Taken: Allow the Connection
Rule Application: Domain, Private, Public
For more information on NTP servers, please see the following link.
How to Configure a NX to use NTP
The NX Motion Controller supports time synchronization with a SNTP or NTP server such as a NTP server running on Windows 11. The configurations of the NTP Settings are done in the programming platform for the NX - Sysmac Studio.
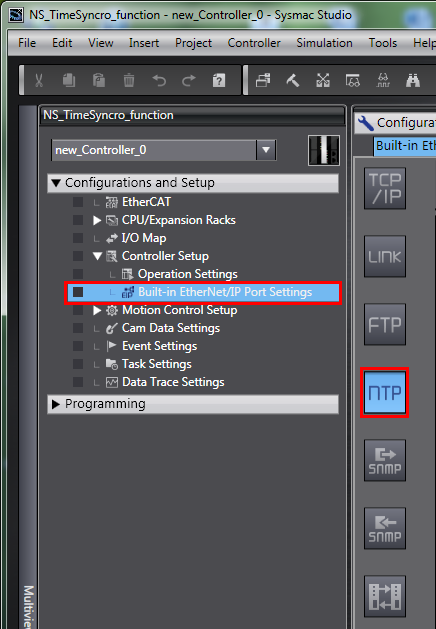
The designated NTP Server for the NX can be configured in the section: Configurations and Setup > Controller Setup > Built-in Ethernet/IP Port Settings > NTP Setting, this is also shown in the illustration below.
Within the NTP Settings the NTP Server Clock Information can be enabled or disabled, it is disabled by default. To enabled time synchronization select ‘Get’ NTP Server Clock Information as shown in the illustration below.
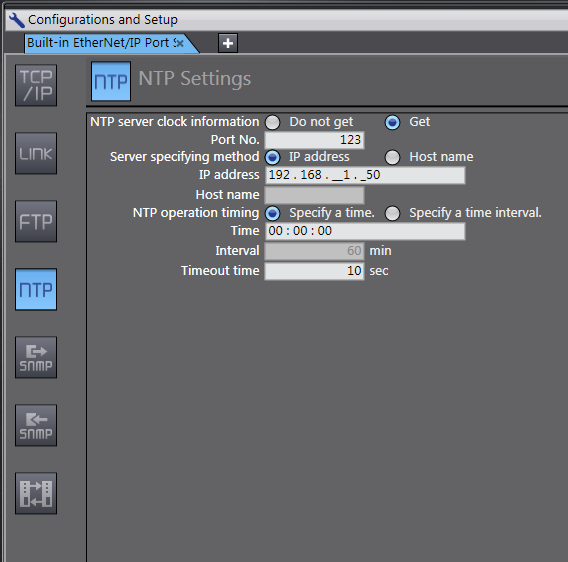
When the NTP Server Clock Information is enabled the settings can be configured. The port no. is by default 123 this should not be changed because this port number is used for Network Time Protocol (NTP).
For more information about TCP1L and UDP port numbers please visit: UDP and TCP1L port numbers.
The second setting is specifying the server method, in other words how the NX does addresses the NTP server; this can be via an IP-address or via a Host Name. The third setting is the NTP operation timing, within this setting the time can be set to execute the time synchronization. This can be achieved by specifying a time or specifying a time interval.
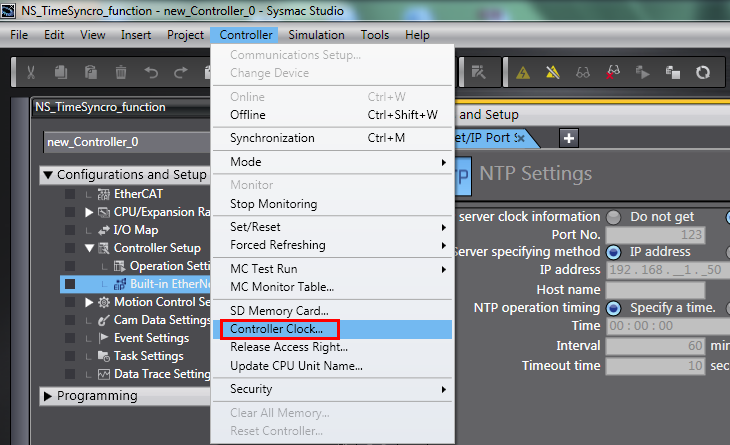
With the above settings the NX is ready to synchronize time with a NTP Server. However it is important to know that the NX also uses time zone as a reference for its internal clock. The time region is by default set to Japan but this can be easily modified. However to modify the time zone reference for the internal clock, Sysmac Studio needs to be connected to the NX. While Sysmac Studio is online, the internal clock can be modified in: Controller > Controller Clock… as shown in the illustration below. This feature does not work while Sysmac Studio is offline.
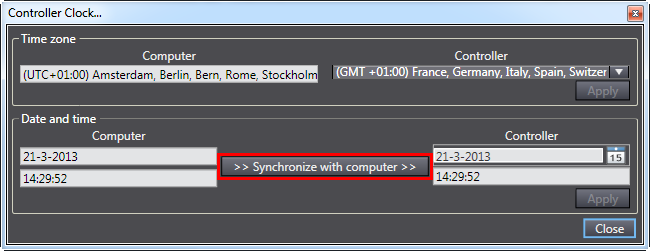
The controller clock time zone can be modified as shown in the illustration below. Sysmac Studio also recognizes the time zone of the operating system that runs Sysmac Studio.

Time synchronization is also possible by executing the ‘Synchronize with computer’ as shown in the illustration below. Be aware that when the time zone of the NX is changed after synchronizing with the computer, the internal clock will also change according to the time difference between the time zones. Make sure to first set the time zone and then manually synchronize with the computer if needed.
How to Configure a CP1L to use NTP
The CP1L Controller supports time synchronization with a SNTP or NTP server such as a NTP server running on Windows 11. The configurations of the NTP Settings are done in the programming platform for the CP1L - CX-Programmer.
The designated NTP Server for the CP1L can be configured in the section: Settings> Clock Auto Adjustment> , this is also shown in the illustration below.
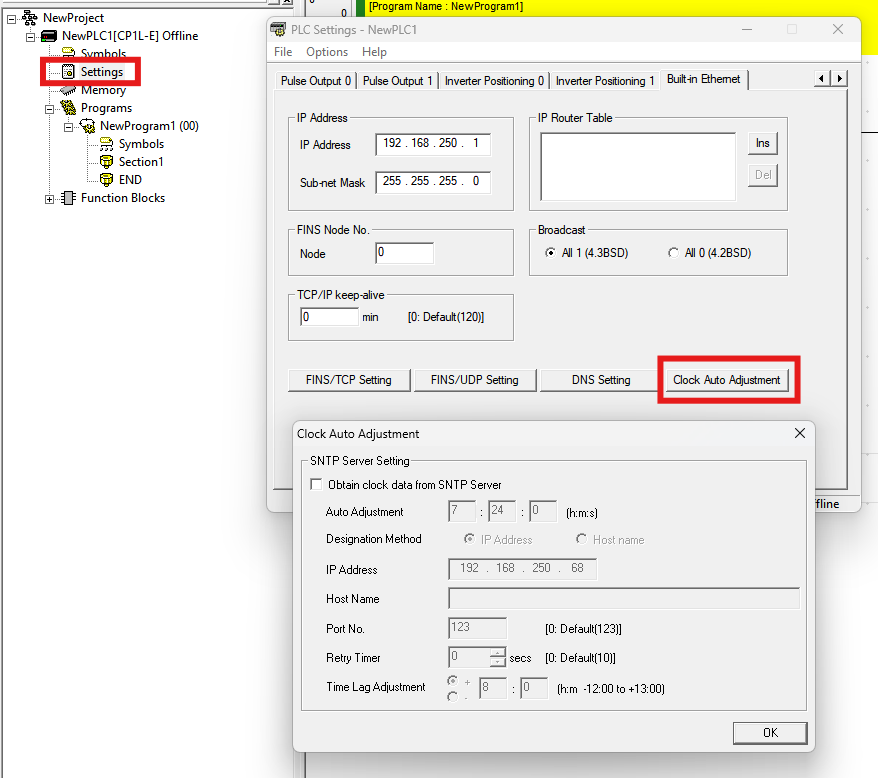
Within the SNTP Settings the NTP Server Clock Information can be enabled or disabled, it is disabled by default. To enabled time synchronization select ‘Obtain clock data from SNTP Sever’ NTP as shown in the illustration below.
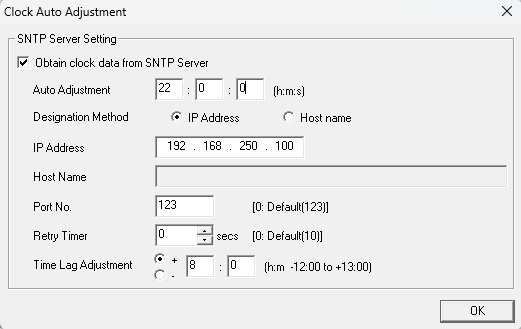
Set the Auto Adjustment time, at this time of day the PLC will query the NTP server to update its clock.
The second setting is specifying the server method, in other words how the CP1L does addresses the NTP server; this can be via an IP-address or via a Host Name.
When the NTP Server Clock Information is enabled the settings can be configured. The port no. is by default 123 this should not be changed because this port number is used for Network Time Protocol (NTP).
For more information about TCP1L and UDP port numbers please visit: UDP and TCP1L port numbers.
The Retry timer is used in the event that the PLC fails to communicate with the NTP server, this can be left on the default value.
Finally you may set the time zone with the Time Lag Adjustment. The valid range is from -120h to +13h.
With the above settings the CP1L is ready to synchronize time with a NTP Server.
A power cycle is required for the above changes to take effect after transferring the settings to the PLC.
Accounting for Daylight Savings NX
The NX Time zone function does not take daylight savings in to account. This means that by default the time does not update when daylight savings begins.
To work around this, store the system time in a user variable, and offset it when daylight savings begins.
The Daylight Savings Time compensation feature uses a Function Block named DST_Compensation. To use DST_Compensation, simply turn the Enable input on. The offset from UTC (time zone) must be passed into the function block in the UTCZoneShift input. Below, Eastern Time (US) is shown, which is UTC – 5 hours. The state of Daylight Savings Time is shown in the DST_Active output (on / off). The final output of function block is Local_Date_and_Time. This is the variable that will reflect the NX / NJ RTC, offset by the local time zone and Daylight Savings Time.
The user will need to define the dates when daylight savings starts and finishes.
The below example program uses the function block that you may copy.
NX NJ Daylight Savings Time Compensation with NTP Server.smc2
Accounting for Daylight Savings CP1L
The CP1L Time Lag Adjustment function does not take daylight savings in to account. This means that by default the time does not update when daylight savings begins.
To work around this, store the system time in the D area, and offset it when daylight savings begins.
The below example shows code that copies the RTC to the D area, and applies a offset to it when daylight savings is activated. The user will need to define the dates when daylight savings starts and finishes.