Precaution
This article covers how to implement a custom Precision Drive target for our AMR series and therefore does not guarantee the same level of position accuracy and/or repeatability achieved by using the built-in target shapes.
We strongly suggest to carryout several test before commissioning the AMR with Custom Targets to confirm that the operation of the AMR after loading the Custom Targets complies with application requirements.
Equipment used
- Mobile Robot LD/HD Platform FLOW 2.0.1
- Mobile Planner 5.4.0
- Notepad
Overview
Precision drive allows users to configure a positioning of the mobile robot in reference to a target rather than using global positioning. It can be used without a CAPS license, but to achieve a higher level of accuracy (± 8mm and ± 1.0°) you will require the CAPS license.
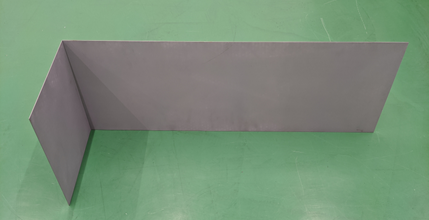
The default target shape is 1000mm x 250mm at 90° (for the height, it just has be visible by the laser scanner of the robot).
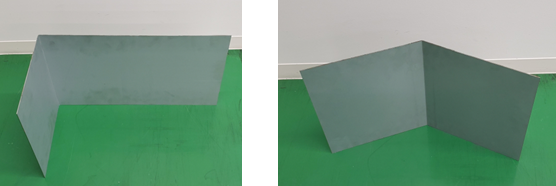
For certain applications this shape will not suit the place or location where the AMR has to perform the accurate positioning, therefore a custom shape might be required. Below are 2 examples of custom shapes such as a shorter version of the ‘L’ shape above or a triangle.
Custom target configuration method
Creation of the setup files
We will create a file that will contain our custom targets called PrecisionDriveCustomTarget.txt
- Open Notepad to create the new txt. file called PrecisionDriveCustomTarget.txt
- Enter the following custom target information in Notepad.
- name: triangle
- type: 1
- target points
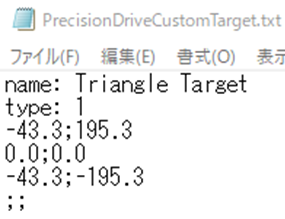
- Save the file and make sure the name is “PrecisionDriveCustomTarget.txt”
‘Type’ is to specify the unit of measurements used for the target definition.
- Type 1 = millimeters
- Type 2 = centimeters
- Type 3 = meters
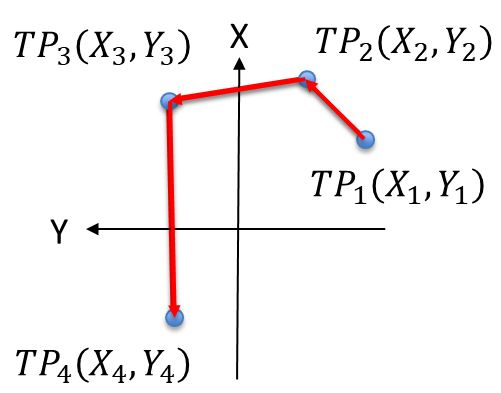
Target points specifies the points of the X/Y coordinates that will form the target. Up to 25 target points can be defined per target. Below is an example of using X/Y points to define a target.
Note: the points must be defined in a counterclockwise order.
You can create up to 5 custom targets.
There are a few precautions when creating the custom targets.
- The overall area of the custom target must be less than 4m²
- The minimum area for an L-shape type is 500mm x 250mm
- The minimum area for a triangle shape type is 250mm x 250mm x 135°
Configuration file upload
Once you have completed the information required in the PrecisionDriveCustomTarget.txt now you will need to load this file on the robot.
- Open MobilePlanner software and connect to the Mobile Robot
- Under “file” go to “Download/Upload” and select the IP Address of the Mobile Robot
- Upload the file create “PrecisionDriveCustomTarget.txt” in the root directory of the AMR.
- Restart the AMR after successfully uploading the file.
- Once the AMR has rebooted you will be able to see the custom targets as options when implementing precision drive.
A few precautions:
- When the AMR is connected with Enterprise Manager, make sure to upload the PrecisionDriveCustomTarget.txt to all the AMR units in the fleet.
- If you do not do this, features other than Precision Drive may also fail to function properly.
Verification
- Connect to the AMR and open the map
- Select the PrecisionDrive task allocated and select a target.
- If you can see the name of the target you have created then the configuration has been successful.
- Get the AMR to perform the PrecisionDrive with the custom target created, and if you can see the target shape appear on the map in GREEN, then you have successfully completed the task of implementing Custom Target for Precision Drive.